Ultimate Flutter BLoC Guide: State Management Best Practices
Flutter is an improvement toolkit created by means of Google that permits developers to build applications for multiple systems, together with Android, iOS, Linux, Mac, windows, Google Fuchsia, and the internet, all from a single codebase. One massive mission in making Flutter apps is handling nation, which is the data the app maintains music of as humans use it. That’s the location where BLoC rescue us. BLoC is a manner to manage country and occasions in Flutter apps. It splits up the app’s good judgment from its consumer interface, makes less difficult for us to understand, hold, and test. the use of BLoC well can make growing apps smoother and enhance the very last product.
Introduction to BLoC Pattern in Flutter
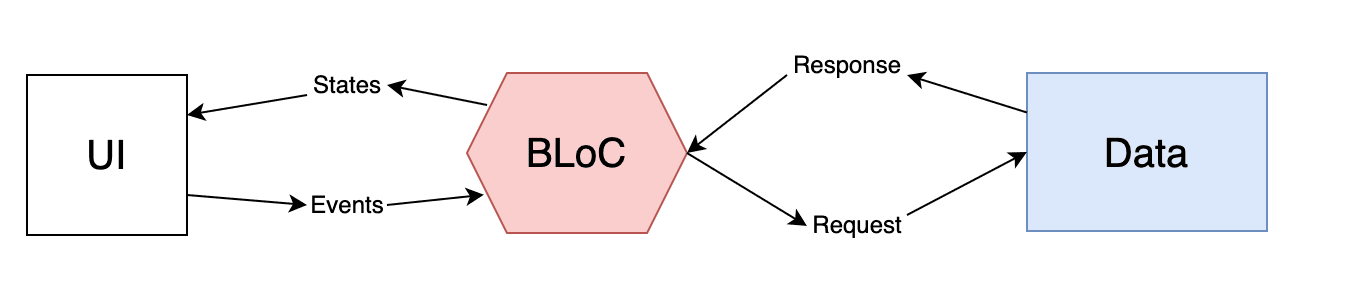
The BLoC pattern is what holds Flutter applications when it comes to managing states and business logic in any instances. It allows for the separation of UI from the underlying logic so that a change in state will propagate a response on the user interface without having the need to control it directly. This separation helps in increasing clarity, maintainability, and testability.
Core Components of the BLoC Pattern
- Events: These represent inputs to a BLoC, usually triggered by user actions such as button clicks, text entries, or other interactions within the app.
- States: These are the outputs generated by a BLoC, representing the current state or condition of a particular part of your app at any given time.
- BLoC: The BLoC component handles the incoming events and produces corresponding states, encapsulating all the business logic of your application.
How the BLoC Pattern Works
- User Interaction: The process begins when the user performs an action, such as pressing a button.
- Event Dispatch: This user action triggers an event that is sent to the BLoC.
- State Generation: The BLoC processes the incoming event and generates a new state based on the logic defined within it.
- UI Update: The UI listens for changes in the state from the BLoC and updates itself accordingly.
This pattern enforces great separation of business logic from UI code and is very modular and creates highly testable applications. It means that to use effectively the BLoC pattern, you must at least know the basics of reactive programming since the pattern relies on streams for handling state changes.
In Flutter, you can implement the BLoC pattern using the Flutter BLoC library. Key components include:
- BlocBuilder: A widget that listens to the BLoC’s state stream and rebuilds itself whenever the state changes.
- BlocProvider: A widget that provides the BLoC instance to the widget tree, ensuring it’s accessible to all widgets within that tree.
Why Use the BLoC Pattern?
One of the most predominant challenges in apps is to write code that is clear, organized, maintainable, and testable. While rapid development might be needed, sometimes the burden for sustaining a codebase requires an architecture that would comfortably host scalable code, hence making it easy to add new features. Separating user interface from business logic is how to ideally realize clean and maintainable code in Flutter. The separation is provided by a BLoC pattern, so it’s easier to manage and scale your application.
Benefits of Using the BLoC Pattern
- Logic Separation: BLoC separates the business logic from the User Interface, thereby resulting in more readable and maintainable code.
- Reusability : This isolation of Business Logic through a BLoC enables the reusage of the same business logic at different places in an app or even different apps.
- It means testability: independent of UI, unit tests can be written for business logic in BLoC, making an application more reliable.
- Consistency: BLoC provides consistency in the way state change events are handled. This makes the app more predictable and easier to debug.
- Scalability: It helps in scaling when your app starts to grow in complexity, since BLoC keeps your business logic very organized and modular.
- Stream-Based Architecture: dart BLoC makes an appeal to streams in the handling of state, which goes well with the principles of reactive programming and hence developing efficient and responsive apps.
- Community and Support: Since it was introduced by Google, BLoC has strong community backing with abundant resources for learning and troubleshooting.
Effective Strategies for BLoC State Management
- Focus on BLoC Scope: Ensure each BLoC handles a specific task or feature in your app, which simplifies managing, testing, and maintaining it.
- Optimize Event and State Usage: Clearly define events and states to keep them straightforward and aligned with their intended purposes, avoiding unnecessary complexity.
- Maximize BlocProvider Usage: Use BlocProvider effectively across your widget tree to inject dependencies seamlessly and access BLoCs wherever necessary.
Comparing BLoC with Other State Management Solutions
While the BLoC pattern has many advantages, it’s crucial to evaluate other state management solutions in Flutter, such as Provider, Riverpod, and GetX, each with its own unique benefits. Provider is a popular choice that uses InheritedWidgets for state management, offering a straightforward and effective solution, especially for new applications. Riverpod, building on Provider’s principles, provides a more flexible and robust approach, eliminating the need for context to access providers, which enhances testability and scalability.
GetX is known for its simplicity and performance, integrating reactive state management, dependency injection, and route management into a single package. This makes it ideal for projects that require quick development cycles and minimal boilerplate code. The decision between BLoC, Provider, Riverpod, and GetX ultimately depends on your project’s specific needs, your team’s familiarity with these tools, and personal preferences, as each offers distinct advantages suited to different development scenarios.
Complete Environment Setup Tutorial: Flutter and BLoC
Before starting to develop in Flutter with BLoC, the development environment has to be correctly set up. In this guide, you will go through all the necessary steps to start developing in Flutter with the BLoC library properly.
Flutter Installation:
- Download Flutter SDK:
- Begin your Flutter journey by downloading the compatible SDK for your operating system (Windows, macOS, or Linux) from the Flutter website.
- Extract the Flutter SDK:
- Extract the downloaded file to a proper location on your computer.
- Update Your Path:
- Add the path of the Flutter SDK to your system’s environment variables. This will allow you to run Flutter commands in any terminal or Command Prompt window. For this, you can refer to detailed instructions for your specific OS on the Flutter
- Run flutter doctor:
- Open a terminal or Command Prompt and execute flutter doctor. This command examines your system and then provides a report about configuration problems. Make sure to resolve any issues raised in the report for flawless Flutter development.
Flutter IDE Setup:
- Choose an IDE:
- Choose a robust IDE for Flutter development from popular options like Android Studio, Visual Studio Code, or IntelliJ IDEA. These environments provide comprehensive Flutter and Dart support, including essential plugins.
- Install Flutter and Dart Plugins:
- Import the flutter and dart plugins on your favorite IDE. These plugins bring some of the basic tools and features of Flutter development that simplify it. Below find a more generalized way of installing the plugins. The Flutter documentation for every IDE contains updated specifics on how to IDE, so again refer to it for every respective IDE.
By following these steps, you’ll ensure your development environment is properly configured for efficient Flutter development
1. Project Setup
- Create a new project:
flutter create flutter_bloc- Add some dependencies in pubspec.yaml:
dependencies:
 flutter:
   sdk: flutter
 flutter_bloc: ^8.0.1
 equatable: ^2.0.3
 bloc:
 http:
Flutter App Folder Structure
Overview
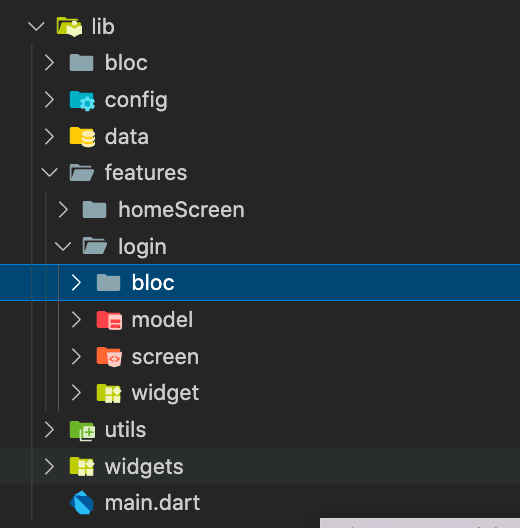
This folder structure is designed to organize a Flutter application in a very well-ordered and modular way, making it scalable. This separation of concerns will give maintainability and makes development easier. Here is what each directory does:
Folder Structure Explanation
- lib
- The root directory containing all Dart files and related resources for the Flutter application.
- main.dart: The entry point of the Flutter application.
- bloc
- Houses global BLoC (Business Logic Component) files, which manage state and business logic shared across the entire app. This includes common BLoCs, events, and states not tied to any single feature.
- config
- Contains configuration files like constants, route definitions, themes, and other global settings utilized throughout the application.
- data
- Manages data-related components such as models and repositories.
- models: Data models representing the structure of data within the app.
- repositories: Handle data access logic, managing communication with APIs, databases, or other data sources.
- Manages data-related components such as models and repositories.
- feature
- Contains subfolders for each specific feature of the application, with each feature being self-contained.
- login
- Manages all aspects of the login feature.
- bloc: Contains BLoC files, events, and states specific to the login feature.
- model: Holds model classes utilized within the login feature.
- screen: Contains UI/screen files for the login feature.
- widget: Custom widgets specific to the login feature.
- Manages all aspects of the login feature.
- login
- Contains subfolders for each specific feature of the application, with each feature being self-contained.
- utils
- Contains utility functions and helper classes offering reusable methods and functionalities across the app.
- widget
- Stores global custom widgets that are reusable across different parts of the application.
Advantages of This Structure
- Modularity: Each feature is independent, so the development and maintenance of features become easier without affecting the rest.
- Scalability: New features can be added without any conflicts or clutter.
- Whenever the several aspects of the app, such as UI, business logic, or data, are kept separated, it becomes understandable, maintainable, and debuggable.
- Reusability: It gives a central holding area for common widgets and utilities, fostering code reusability and decreasing duplication.
- Clarity: Proper folder structure allows new developers to understand the layout of the project easily and feel certain to develop things more efficiently.
Creating a Simple Flutter BLoC Example for User Login
main.dart File
This main.dart file serves as the entry point for the Flutter application. It sets up the main widget, configures the app’s theme, and defines the initial route and route generation for navigation within the app.
import 'package:flutter/material.dart';
import 'package:logindemobloc/config/routes/routes.dart';
import 'package:logindemobloc/config/routes/routes_name.dart';


void main() {
 runApp(const MyApp());
}


class MyApp extends StatelessWidget {
 const MyApp({super.key});
 @override
 Widget build(BuildContext context) {
   return MaterialApp(
     title: 'Flutter Demo',
     theme: ThemeData(
       colorScheme: ColorScheme.fromSeed(seedColor: Colors.deepPurple),
       useMaterial3: true,
     ),
      initialRoute: RoutesName.login, // Initial route
     onGenerateRoute: Routes.generateRoute, // Generating routes
     debugShowCheckedModeBanner: false,
   );
 }
}
- initialRoute:
- initialRoute in your MaterialApp configuration specifies the starting point of your application when it launches.
- In your code, initialRoute: RoutesName.login indicates that when the app starts, it navigates directly to the route identified by RoutesName.login.
- This is typically used for defining where the user interface should begin, such as a login screen or a home screen.
- onGenerateRoute:
- onGenerateRoute is a callback function that Flutter invokes when navigating to a named route that isn’t directly defined in MaterialApp.routes.
- Instead of defining every possible route statically, onGenerateRoute allows you to dynamically generate routes based on runtime conditions or parameters.
- In your code, onGenerateRoute: Routes.generateRoute suggests that Routes.generateRoute (imported from routes.dart) is responsible for creating and returning a PageRoute object based on the requested route name.
- This approach is crucial for handling routes that require dynamic data or parameters, like a user profile or settings page where the content varies based on user input or session state.
login_event.dart File
The event file is where you define classes that represent distinct events that can occur within your application’s login functionality. These events typically encapsulate user interactions, asynchronous operations like API calls, or any action that can trigger a change in the application’s state.
Structure of the Event File
1. Abstract Class LoginEvent
abstract class LoginEvent extends Equatable {
  const LoginEvent();


  @override
  List<Object> get props => [];
}
An Abstract Class: LoginEvent is an abstract class in Dart; therefore, it cannot exist on its own but serves like a blueprint to its subclasses.
Equatable: A utility class in Dart that extends Equatable to help with value-based equality checks. As a result, it defines props as the properties that are used for checking equality.
2. Concrete Event Classes
EmailChanged Event
class EmailChanged extends LoginEvent {
  const EmailChanged({required this.email});
  final String email;
  @override
  List<Object> get props => [email];
}
EmailChanged: Represents an event where the user changes their email input.
Constructor: Takes a required email parameter.
Equatable Override: Overrides props to include only email, ensuring equality comparison considers only the email field.
PasswordChanged Event
class PasswordChanged extends LoginEvent {
const PasswordChanged({required this.password});
final String password;
  @override
  List<Object> get props => [password];
}
PasswordChanged: Represents an event where the user changes their password input.
Constructor: Takes a required password parameter.
Equatable Override: Overrides props to include only password.
LoginApi Event
class LoginApi extends LoginEvent {}LoginApi: Represents an event where the user initiates a login via an API call.
No Additional Data: This event does not require additional parameters beyond its type.
Inherits props from LoginEvent: Since it doesn’t have additional properties, it inherits the props definition from LoginEvent, which returns an empty list by default.
Why Use an Abstract Class and Events?
- Abstraction: Using an abstract class (LoginEvent) allows you to define a common structure (props) and enforce a contract for all events related to login functionality.
- Stronger Type Checking: Leveraging custom event classes for user interactions (EmailChanged, PasswordChanged) and system events (LoginApi) reinforces type safety, resulting in more robust and understandable code.
- Integration with BLoC: The BLoC architecture promotes a clear separation of concerns. User actions trigger events that are dispatched to the BLoC, acting as the application’s brain. The BLoC then orchestrates state changes based on incoming events, resulting in a more manageable and testable codebase.
Full Code:
part of 'login_bloc.dart';
abstract class LoginEvent extends Equatable {
 const LoginEvent();
 @override
 List<Object> get props => [];
}
class EmailChanged extends LoginEvent {
 const EmailChanged({required this.email});
 final String email;
 @override
 List<Object> get props => [email];
}
class PasswordChanged extends LoginEvent {
 const PasswordChanged({required this.password});
 final String password;
 @override
 List<Object> get props => [password];
}
class LoginApi extends LoginEvent {}
login_state.dart File
The LoginState class serves as a blueprint for managing and representing the state of the login screen. It encapsulates all relevant data and status indicators necessary for rendering the UI based on different user interactions and asynchronous operations.
part of 'login_bloc.dart';


enum LoginStatus { initial, loading, success, error }


class LoginState extends Equatable {
 const LoginState({this.email = '', this.password = '', this.message = '', this.loginStatus = LoginStatus.initial});


 final String email;
 final String password;
 final String message;
 final LoginStatus loginStatus;


 LoginState copyWith({
   String? email,
   String? password,
   String? message,
   LoginStatus? loginStatus,
 }) {
   return LoginState(
     email: email ?? this.email,
     password: password ?? this.password,
     message: message ?? this.message,
     loginStatus: loginStatus ?? this.loginStatus,
   );
 }


 @override
 List<Object> get props => [email, password, message, loginStatus];
}
Key Elements:
- Properties:
- email, password, message: Variables storing the user’s email, password, and potential error text.
- loginStatus: A discrete set of values, LoginStatus, signifying the different phases of the login flow: initial, loading, successful, or error.
- Methods:
- copyWith: Creates a new LoginState object with updated values, ensuring immutability. This method is crucial for maintaining the integrity of state objects during state updates.
- Equatable Integration:
- props method: Overrides Equatable’s props method to define which properties are used to determine equality between LoginState instances. This is essential for efficient state management and UI updates in Flutter.
login_bloc.dart File
Effectively managing intricate state and business logic is paramount to crafting robust Flutter applications. The BLoC architecture offers a structured approach to decoupling UI components from core application logic. By encapsulating business rules within dedicated components, BLoC enhances code clarity, adaptability, and testability. Let’s explore how to implement a LoginBloc to masterfully handle state and logic within a login screen.
Key Components
Imports and Part Directives
import 'package:bloc/bloc.dart';
import 'package:equatable/equatable.dart';
import 'package:logindemobloc/data/repositories/login/login_services.dart';


part 'login_event.dart';
part 'login_state.dart';
Imports: Essential packages (bloc and equatable) and a custom LoginServices class for handling login operations.
Part Directives: Includes login_event.dart and login_state.dart, which define events and states used by LoginBloc.
LoginBloc Class Definition
class LoginBloc extends Bloc<LoginEvent, LoginState> {
  LoginServices loginServices = LoginServices();


  LoginBloc() : super(const LoginState()) {
    on<EmailChanged>(_onEmailChanged);
    on<PasswordChanged>(_onPasswordChanged);
    on<LoginApi>(_loginApi);
  }

  // Event handlers
  void _onEmailChanged(EmailChanged event, Emitter<LoginState> emit) {
    emit(
      state.copyWith(
        email: event.email,
      ),
    );
  }


  void _onPasswordChanged(PasswordChanged event, Emitter<LoginState> emit) {
    emit(
      state.copyWith(
        password: event.password,
      ),
    );
  }


  void _loginApi(LoginApi event, Emitter<LoginState> emit) async {
    emit(
      state.copyWith(
        loginStatus: LoginStatus.loading,
      ),
    );
    bool isLogin = await loginServices.loginServices(
        email: state.email, password: state.password);
    try {
      if (isLogin) {
        emit(
          state.copyWith(
            loginStatus: LoginStatus.success,
            message: 'Login successful',
          ),
        );
      } else {
        emit(
          state.copyWith(
            loginStatus: LoginStatus.error,
            message: 'Login failed',
          ),
        );
      }
    } catch (e) {
      emit(
        state.copyWith(
          loginStatus: LoginStatus.error,
          message: e.toString(),
        ),
      );
    }
  }
}
Initialization:
- LoginBloc extends Bloc<LoginEvent, LoginState> and initializes with const LoginState().
- LoginServices loginServices = LoginServices(); initializes a service class for login operations.
Event Handlers:
- _onEmailChanged, _onPasswordChanged: Handle EmailChanged and PasswordChanged events, updating the respective fields in LoginState.
- _loginApi: Handles LoginApi event by initiating a login process:
- Sets loginStatus to Loading.
- Calls loginServices.loginServices method with current email and password.
- Updates LoginState based on the success or failure of the login attempt.
Login_screen.dart File
It uses a StatefulWidget; thus, it updates dynamically in response to user interaction or state change events. This file integrates BLoC with Flutter UI using the flutter_bloc package. This gives clear separation between the UI and the business logic for this file.
LoginScreen Widget
class LoginScreen extends StatefulWidget {
  const LoginScreen({Key? key}) : super(key: key);


  @override
  State<LoginScreen> createState() => _LoginScreenState();
}
The LoginScreen class extends StatefulWidget, meaning it has a mutable state managed by _LoginScreenState.
_LoginScreenState Class
class _LoginScreenState extends State<LoginScreen> {
  late LoginBloc _loginBlocs;


  final emailFocusNode = FocusNode();
  final passwordFocusNode = FocusNode();


  final _formKey = GlobalKey<FormState>();


  @override
  void initState() {
    super.initState();
    _loginBlocs = LoginBloc();
  }


  @override
  void dispose() {
    _loginBlocs.close();
    super.dispose();
  }
State Variables:
- _loginBlocs is an instance of LoginBloc for managing the login state.
- emailFocusNode and passwordFocusNode are FocusNode instances to manage focus for email and password input fields.
- _formKey is a GlobalKey to identify the form and validate its inputs.
Lifecycle Methods:
- initState initializes the LoginBloc.
- dispose closes the LoginBloc to release resources.
build Method
@override
Widget build(BuildContext context) {
  return Scaffold(
    appBar: AppBar(
      title: const Text('Login'),
    ),
    body: BlocProvider(
      create: (_) => _loginBlocs,
      child: Padding(
        padding: const EdgeInsets.all(20),
        child: Form(
          key: _formKey,
          child: BlocListener<LoginBloc, LoginState>(
            listenWhen: (previous, current) =>
                current.loginStatus != previous.loginStatus,
            listener: (context, state) {
              if (state.loginStatus == LoginStatus.error) {
                ScaffoldMessenger.of(context)
                  ..hideCurrentSnackBar()
                  ..showSnackBar(
                    SnackBar(content: Text(state.message.toString())),
                  );
              }


              if (state.loginStatus == LoginStatus.success) {
                ScaffoldMessenger.of(context)
                  ..hideCurrentSnackBar()
                  ..showSnackBar(
                    const SnackBar(content: Text('Login successful')),
                  );
                Navigator.pushNamedAndRemoveUntil(
                    context, RoutesName.home, (route) => false);
              }
            },
            child: Column(
              crossAxisAlignment: CrossAxisAlignment.center,
              mainAxisAlignment: MainAxisAlignment.center,
              children: [
                BlocBuilder<LoginBloc, LoginState>(
                    buildWhen: (current, previous) =>
                        current.email != previous.email,
                    builder: (context, state) {
                      return TextFormField(
                        keyboardType: TextInputType.emailAddress,
                        focusNode: emailFocusNode,
                        decoration: const InputDecoration(
                            hintText: 'Email', border: OutlineInputBorder()),
                        onChanged: (value) {
                          context
                              .read<LoginBloc>()
                              .add(EmailChanged(email: value));
                        },
                        validator: (value) {
                          if (value!.isEmpty) {
                            return 'Enter email';
                          }
                          return null;
                        },
                        onFieldSubmitted: (value) {},
                      );
                    }),
                const SizedBox(
                  height: 20,
                ),
                BlocBuilder<LoginBloc, LoginState>(
                    buildWhen: (current, previous) =>
                        current.password != previous.password,
                    builder: (context, state) {
                      return TextFormField(
                        keyboardType: TextInputType.text,
                        focusNode: passwordFocusNode,
                        decoration: const InputDecoration(
                            hintText: 'Password',
                            border: OutlineInputBorder()),
                        onChanged: (value) {
                          context
                              .read<LoginBloc>()
                              .add(PasswordChanged(password: value));
                        },
                        validator: (value) {
                          if (value!.isEmpty) {
                            return 'Enter password';
                          }
                          return null;
                        },
                        onFieldSubmitted: (value) {},
                      );
                    }),
                const SizedBox(
                  height: 50,
                ),
                BlocBuilder<LoginBloc, LoginState>(
                    buildWhen: (current, previous) =>
                        current.loginStatus != previous.loginStatus,
                    builder: (context, state) {
                      return ElevatedButton(
                          onPressed: () {
                            if (_formKey.currentState!.validate()) {
                              context.read<LoginBloc>().add(LoginApi());
                            }
                            if (state.loginStatus == LoginStatus.success) {
                              Navigator.pushNamedAndRemoveUntil(
                                  context, RoutesName.home, (route) => false);
                            }
                          },
                          child: state.loginStatus == LoginStatus.loading
                              ? CircularProgressIndicator()
                              : const Text('Login'));
                    }),
              ],
            ),
          ),
        ),
      ),
    ),
  );
}
Scaffold: Provides the structure of the screen with an AppBar and a body containing the form.
BlocProvider: Injects the LoginBloc into the widget tree.
Padding and Form: The form is wrapped in padding and managed by _formKey to handle validation.
BlocListener: Listens for changes in the LoginState. Based on loginStatus, it shows snackbars for error and success messages and navigates to the home screen on successful login.
Column: Organizes the form fields and buttons in a vertical layout.
BlocBuilder: Builds widgets based on the LoginState.
- TextFormField for email and password inputs, with validation.
- ElevatedButton to submit the form, showing a CircularProgressIndicator if the login process is in progress.
Login_services.dart File
class LoginServices {
  Future<bool> loginServices({String? email, String? password}) async {
    Map data = {'email': email, 'password': password};


    try {
      final response =
          await http.post(Uri.parse('https://reqres.in/api/login'), body: data);
      if (response.statusCode == 200) {
        return true;
      } else {
        return false;
      }
    } on SocketException {
      await Future.delayed(const Duration(milliseconds: 1800));
      throw Exception('No Internet Connection');
    }
  }
}
LoginServices Class:
- This class encapsulates the business logic for performing login HTTP requests to the API endpoint at https://reqres.in/api/login.
- Methods:
- loginServices Method:
- Parameters:
- email (String, nullable): The email address entered by the user.
- password (String, nullable): The password entered by the user.
- Returns: A future that resolves to a boolean. true signifies successful login, while false indicates failure.
- Parameters:
- loginServices Method:
- Functionality:
- Data Preparation: Constructs a Map named data containing the email and password.
- HTTP Request: Uses http.post method to send a POST request to the specified URL (https://reqres.in/api/login). The body parameter is set to data, which includes the user’s credentials.
- Response Handling:
- A successful login is indicated by an HTTP 200 OK response.
- A status code other than 200 signifies an unsuccessful login.
- Error Handling:
- Catches SocketException: This occurs if there’s no internet connection when attempting to make the HTTP request.
- Delays execution for 1800 milliseconds (1.8 seconds) using Future.delayed to simulate a pause.
- Throws an Exception with the message ‘No Internet Connection’, indicating the error condition.
Routes_name.dart File
The primary purpose of the RoutesName class is to centralize and provide a single source of truth for route names or identifiers used throughout the application. In Flutter, routes are identified by unique strings, and using constants like those in RoutesName helps avoid hard-coding strings directly in navigation operations, improving code readability and maintainability.
class RoutesName {
 //accounts routes name
 static const String login = 'login_screen' ;
 //home screen routes name
 static const String home = 'home_screen' ;
}
- login Constant:
- Represents the route name for the login screen.
- Defined as static const String login = ‘login_screen’;.
- The const keyword ensures that login is a compile-time constant, meaning its value cannot be changed at runtime.
- This constant can be accessed using RoutesName.login.
- home Constant:
- Represents the route name for the home screen.
- Defined as static const String home = ‘home_screen’;.
- Similar to login, home is also a compile-time constant and can be accessed using RoutesName.home.
Usage:
- Navigation:
- Define constants like RoutesName.login and RoutesName.home to structure navigation and enhance code clarity.
import 'package:flutter/material.dart';
import 'package:logindemobloc/config/routes/routes_name.dart';
import 'package:logindemobloc/features/homeScreen/screen/homescreen.dart';
import 'package:logindemobloc/features/login/screen/login_screen.dart';
class Routes {
 static Route<dynamic> generateRoute(RouteSettings settings) {
   switch (settings.name) {
     case RoutesName.home:
       return MaterialPageRoute(builder: (BuildContext context) => const HomeScreen());


     case RoutesName.login:
       return MaterialPageRoute(builder: (BuildContext context) => const LoginScreen());


     default:
       return MaterialPageRoute(builder: (_) {
         return const Scaffold(
           body: Center(
             child: Text('No route defined'),
           ),
         );
       });
   }
 }
}
Conclusion
The BLoC pattern emerges as a cornerstone for effective state management in Flutter applications. By enforcing a strict separation between business logic and UI, BLoC fosters highly maintainable, testable, and scalable codebases. This architectural approach significantly accelerates development cycles, resulting in robust and resilient applications within the Flutter ecosystem.
FAQs
How do I manage complex interactions between multiple BLoCs?
Answer: Handling complex interactions involves planning how BLoCs communicate. You can use BlocProvider to connect one BLoC with another when necessary. Another method is to use streams to keep track of changes across BLoCs and coordinate actions accordingly.
Can I use BLoC with other state management solutions in Flutter?
Answer: Yes, you can combine BLoC with other tools like Provider or Riverpod. For example, Provider helps manage how BLoCs are accessed and used throughout your app, making it easier to inject dependencies and enhance flexibility.
How do I handle form validation with BLoC in Flutter?
Answer: Form validation in BLoC involves emitting state changes based on user input and validation logic. You can define events for different form actions (like field changes or form submission) and states to represent valid, invalid, or error states. Use streams to propagate validation results to the UI for real-time feedback.